LangChain 会话记忆
2026年1月19日 00:00
未完待续
记忆缓存是对话系统中的重要组件,用于存储和管理对话的上下文信息,让AI助手能记住之前的对话内容,从而提供连贯而个性化的回复。
实现会话记忆,需要将历史信息全部发送给大模型,langchain就提供了记忆的功能,能够在发出消息前追加历史消息和用户输入一并发送给大模型,收到回复时将大模型输出一并写进历史消
未完待续
记忆缓存是对话系统中的重要组件,用于存储和管理对话的上下文信息,让AI助手能记住之前的对话内容,从而提供连贯而个性化的回复。
实现会话记忆,需要将历史信息全部发送给大模型,langchain就提供了记忆的功能,能够在发出消息前追加历史消息和用户输入一并发送给大模型,收到回复时将大模型输出一并写进历史消
有人问:“让怀孕五个月以上的孕妇挤地铁的家庭,真的有必要生娃么?”
这是最近看到某平台上的一个讨论话题,让我顿生一种恍惚感,自己和这个社会是不是越来越陌生了,竟然有人理直气壮有这样的想法并求公众评论。提问者的直接意思是,坐地铁代表经济条件不好,经济条件不好的家庭,是否有必要生娃。网络上有句话,“你为什么要生娃,你家有皇位要继承吗?”意思是穷就别生,也等于认同生娃养娃是极高成本的一件事,高到一个家庭一辈子都未必能够承受。
大家都听多了养娃成本高,网络上这样的声音塑造了很多人的共识,那就是穷就不配生娃。不知何时,逻辑从“因为有了娃,所以要更加努力赚钱养家”变成了“必须有了足够的钱,才能考虑养不养娃”。作为养过娃的人,我同时体验过低成本和高成本。我女儿出生时,没有月子中心,没有进口奶粉,住着出租房,手上也没有什么存款,按现在某些人的标准,是不配养娃的。女儿小学至初中时,随着经济稍微改善,走上了稍高成本养娃路线,几千上万的兴趣班报报报,假期旅游去去去,学区房买买买,硬着头皮负着债,哗哗哗的就把钱花出去了,回过头来看,性价比是极低的。
日常能坐上地铁出行,已经是非常优越了。中国现在有地铁的城市并不多,只有直辖市、省会和沿海发达城市,日常能地铁出行,能坐地铁至少是生活在了一二线发达城市,而且还是离地铁线比较近的核心城区。这样的人群,从数学上绝对是少数,但在互联网上,却是主流。一些人眼里的穷酸,可能是剩下十亿人一辈子享受不到的奢望。
经济发展了,过上更好的生活,是当然的。但应该好到什么程度,参照系在哪里,没有准确的答案。“理想生活”一直在被重新定义。互联网时代,让每个人都更容易看到“理想生活”的样子,却很少展示需要付出的成本。稍微多一点点成本思维,做消费决策可能就容易得多了。
倒没必要对提问者个体过多苛责评价,甚至搞男女对立或者代际对立,多数人的个体性是社会大环境塑造的,而非来自于独立的自我意识,那是个更大的话题。

您从未尝过猪食的滋味,凭什么要求一个受过伤的人歌颂苦难
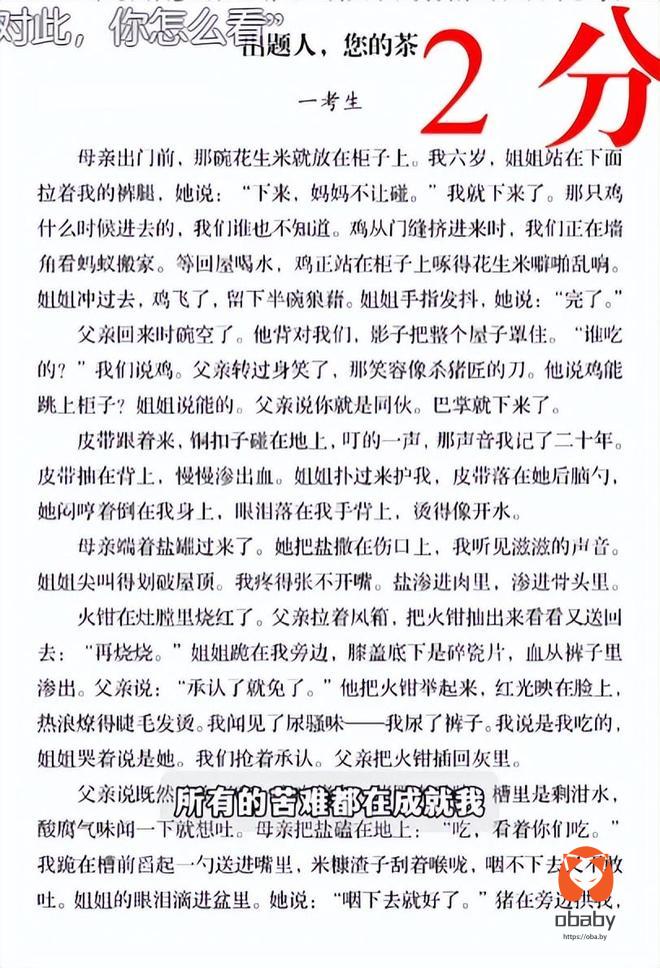
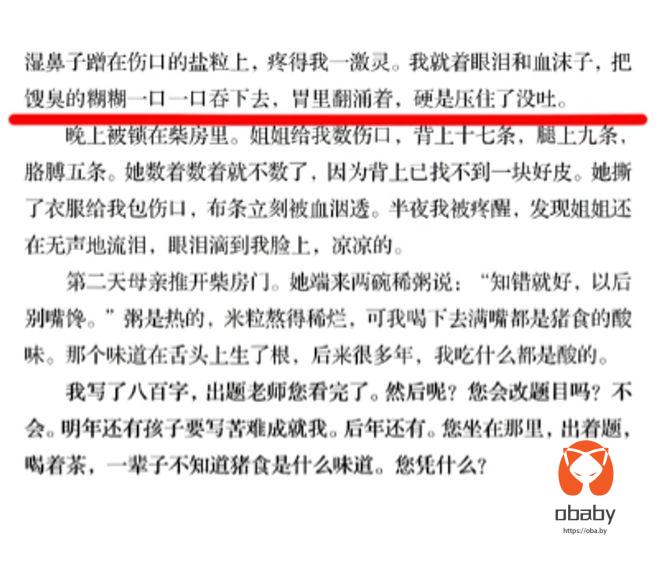
前段时间偶然的机会看到了这个东西,让我不得不再次会看自己这些年的种种选择亦或者说抉择,到底是错还是对。苦难从来不值得歌颂,也没有人喜欢生活在苦难之中,作文最后的这一段反问反而让人有些不适,考试是来给你一个机会,给你一把钥匙。出题人吃过猪食吗?吃过或者没吃过,这个从来都不重要。重要的是自己内心的那点狭隘的自尊心作祟写出了这种文章,不但没有那好到手的钥匙,反而用一把泥堵死了锁眼。
这就是我看到的全部,当然,这种流传的文章不见得就一定是真的高考作文,毕竟网上流传的各种段子实在是太多了,太多为了流量编造各种内容,为了博眼球自然是要制造点话题才可以。
再有比如这个:
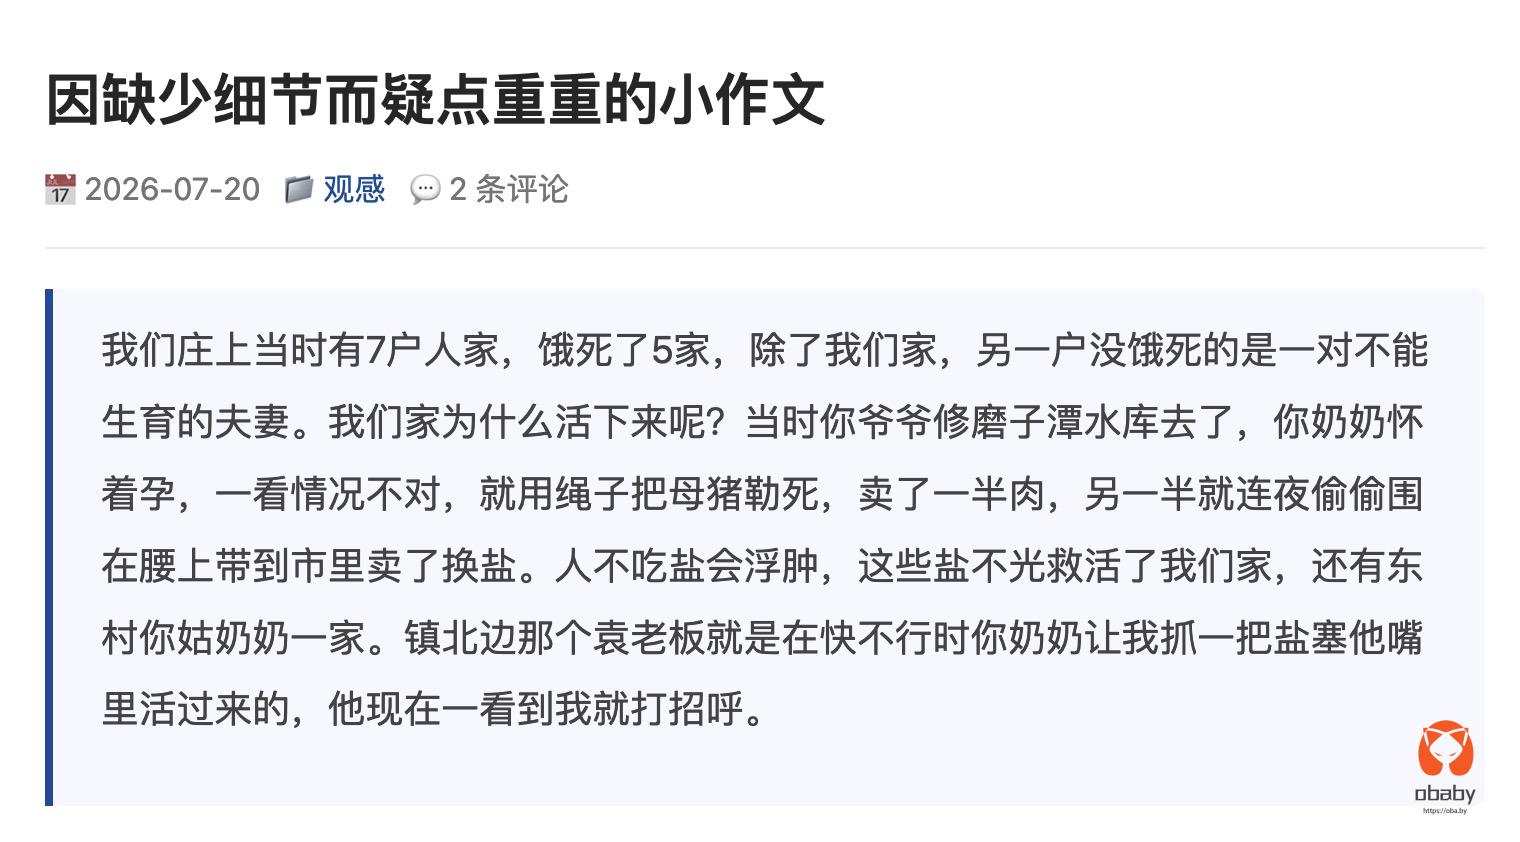
勒死一头猪,像极了没有说生活常识的人写出来的东西。小时候家里养过猪,我最痛恨的事情就是出去往家里赶跑出去的猪。都说笨猪,笨猪,但是,猪跑起来一点都不慢,耐力也比我好多了。我追的时候它在前面跑,我停下来,它也停下来。我再追,它接着跑,始终保持几十米的距离,在村里的胡同里穿过一条有一条。最后实在忍不住了,我就捡石头扔它,咬牙切齿,恨不得石头砸他头上,当场能砸死它,也就遂了我的心意,也才能稍解心头之恨!
如果说一个人勒死一头猪,那真的是得力大无穷。相反,勒死一个人反而更容易。人无法描述自己没有见过的东西,凭借想象写出来的东西自然不伦不类。
如果说苦难,那《活着》里面的富贵才是真的苦难。一个人埋葬了自己所有的家人,儿子被抽血抽死、女婿掉进河里淹死。一次次的跳花鼓灯,是为了歌颂苦难吗?从来都不是,只是这千百年来坚韧的品格,让这些朴实的人坚韧的活着。
都活现在年轻人的比以前的日子过的好太多,哪里来的压力?一代人有一代人的困境,不过是面对的苦难不同了而已。体力的,心理的,一层层的压下来。生活的压力从来都没减小,唯一能做的不过是像野草一样活着,哪怕只有一丝生机。
周末的时候收到大姨的消息,一堆语音消息里面还夹杂着一个pdf文件,是一份简历。
不用听,我都知道是干什么的。打开简历看了一下,单薄的一页简历,专业:环境工程。
看到这个之后,其实我就知道,我从我当前的能力范围之内找不到相关的岗位,连可介绍的岗位都没有。晚上,跟对象说这件事情,对象说:『这个专业的确没什么戏,更何况学校也非常一般』
今天中午接到宝子姥姥的电话:『你吃饭没?』
『吃过了』我答到,肯定不是来问这个的。
『你大姨给你发的微信,你没回?你看看什么情况到时候给他回一下。』这才是最终的目的,后面介绍为什么有这件事情。
『我找找看吧,我先看看』我应付道,这件事情其实我自己也无能为力,连我自己的事情都无能为力,别人的事情又能如何呢?
从那个四面环山的小山村走出来,可能他们觉得我似乎是有那么点成功的迹象。
只有我知道,我还是那山间的野草,从来都没变。

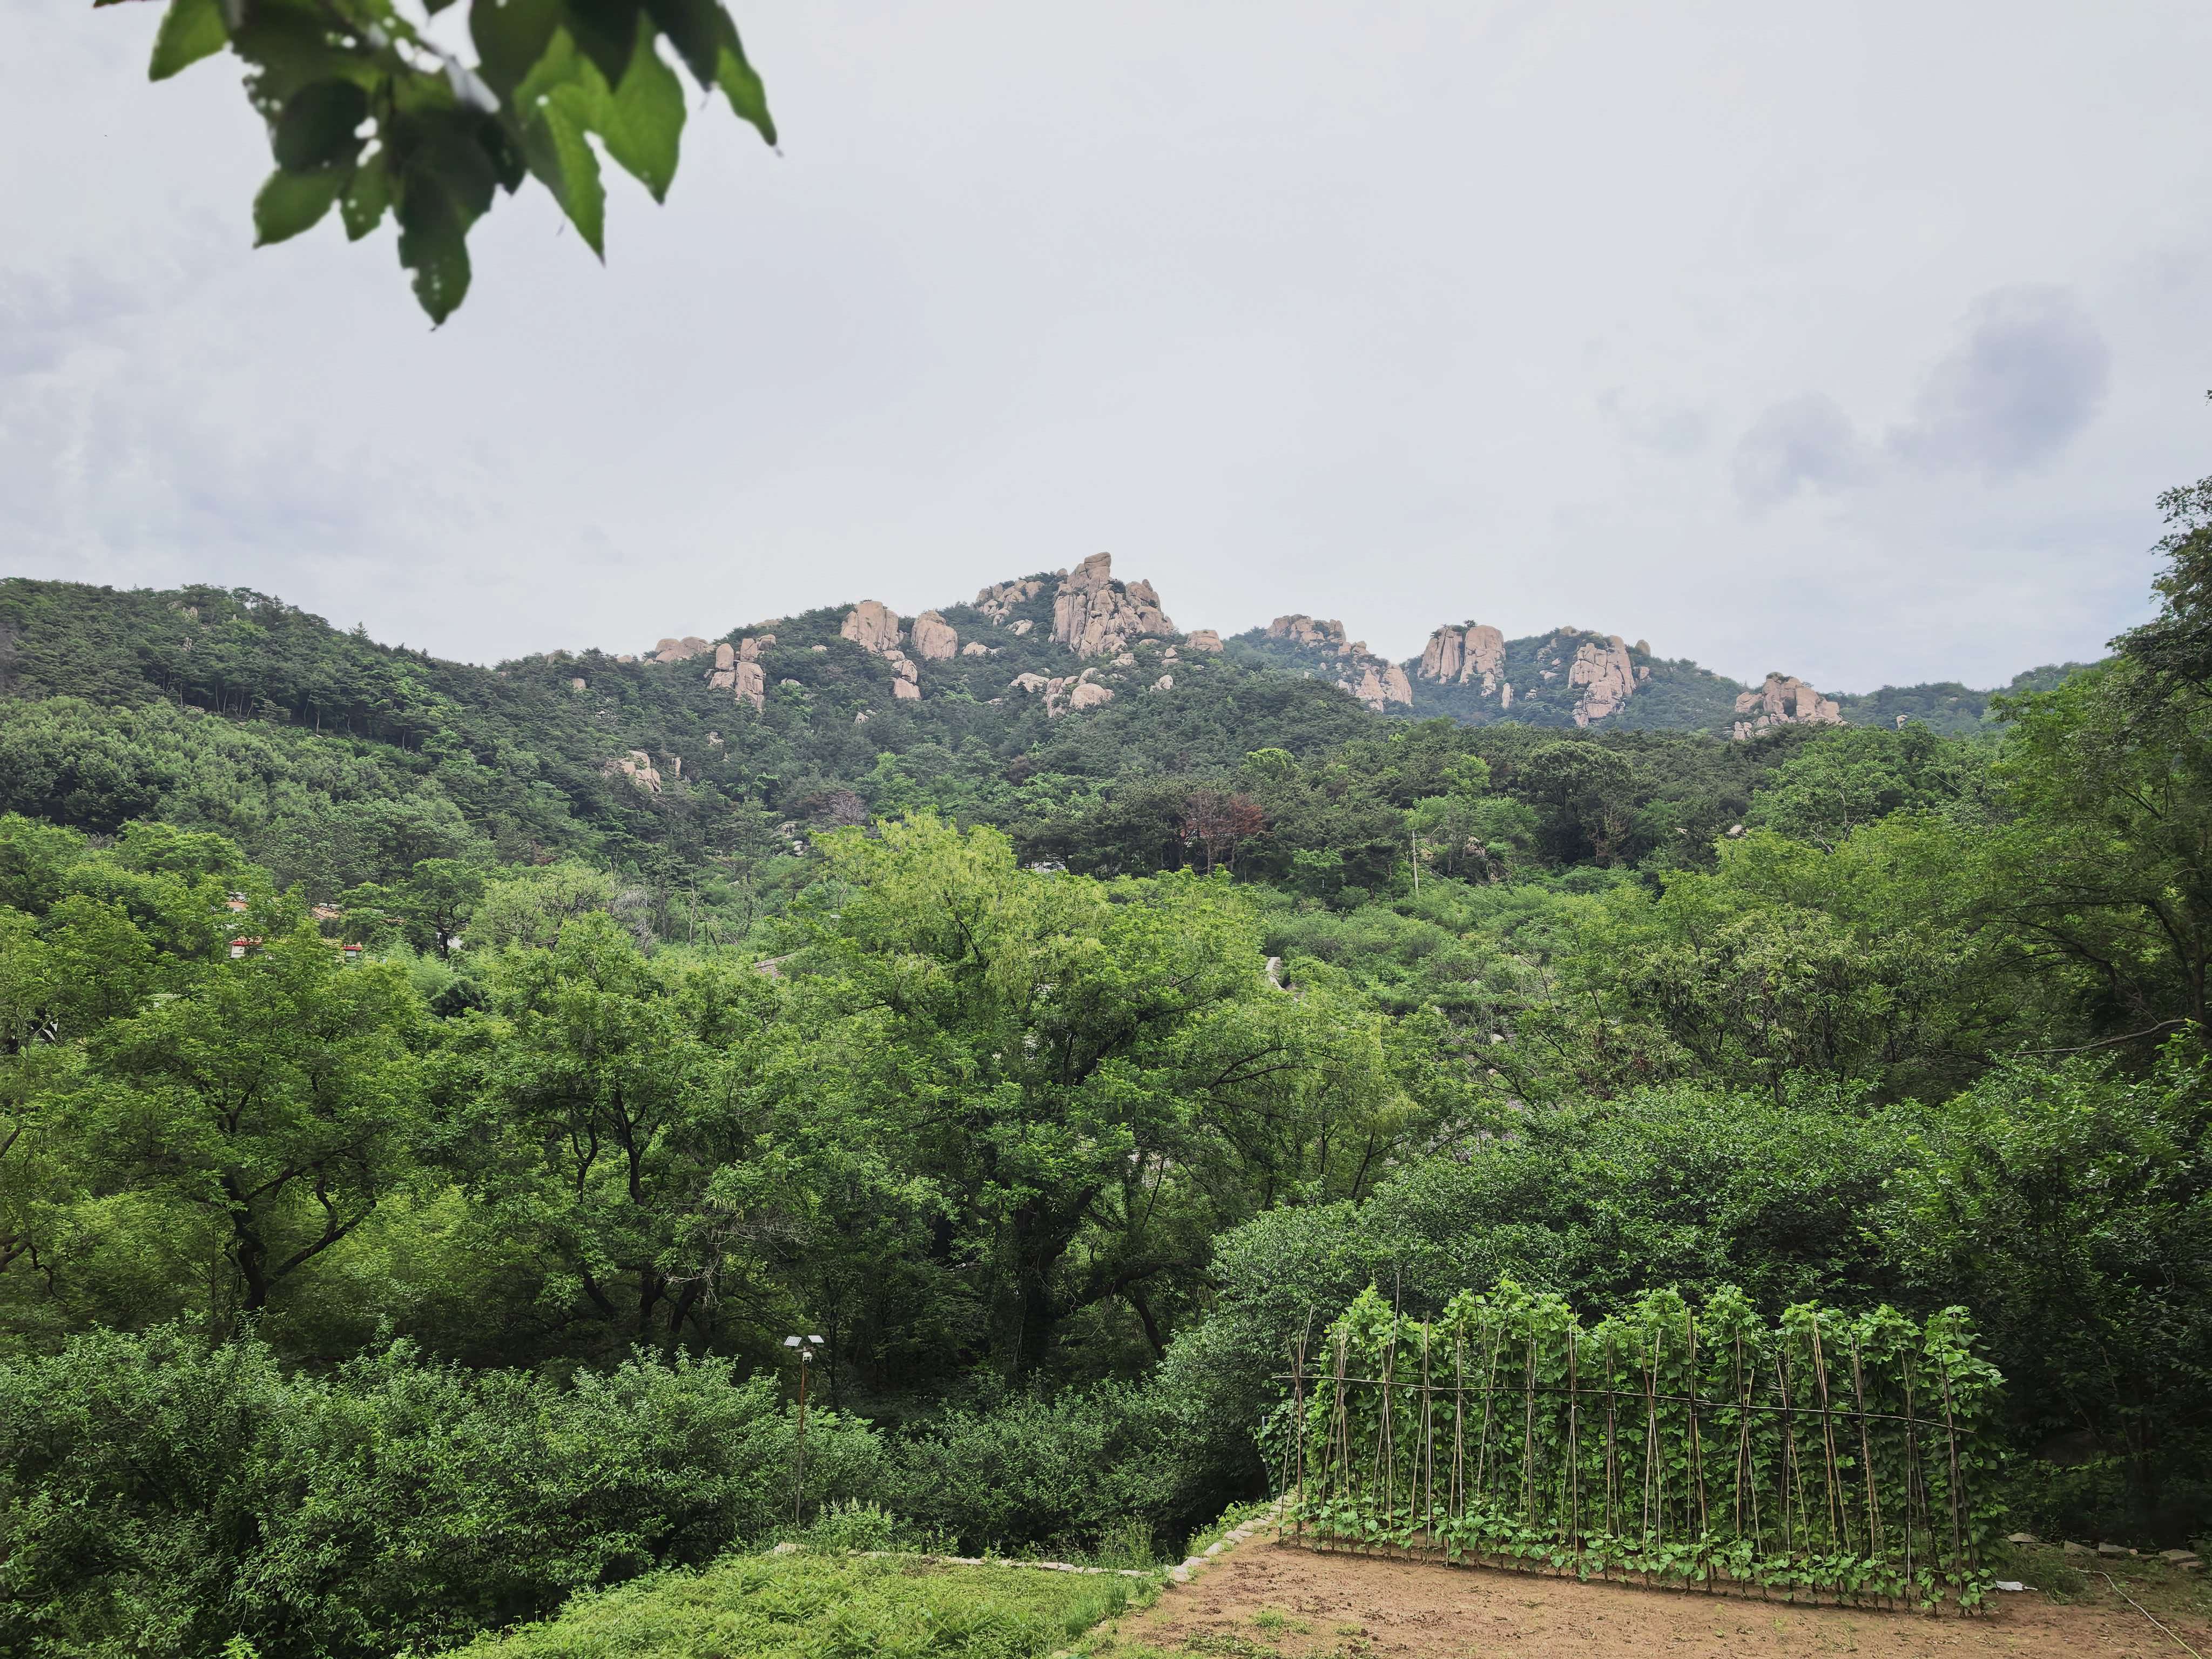
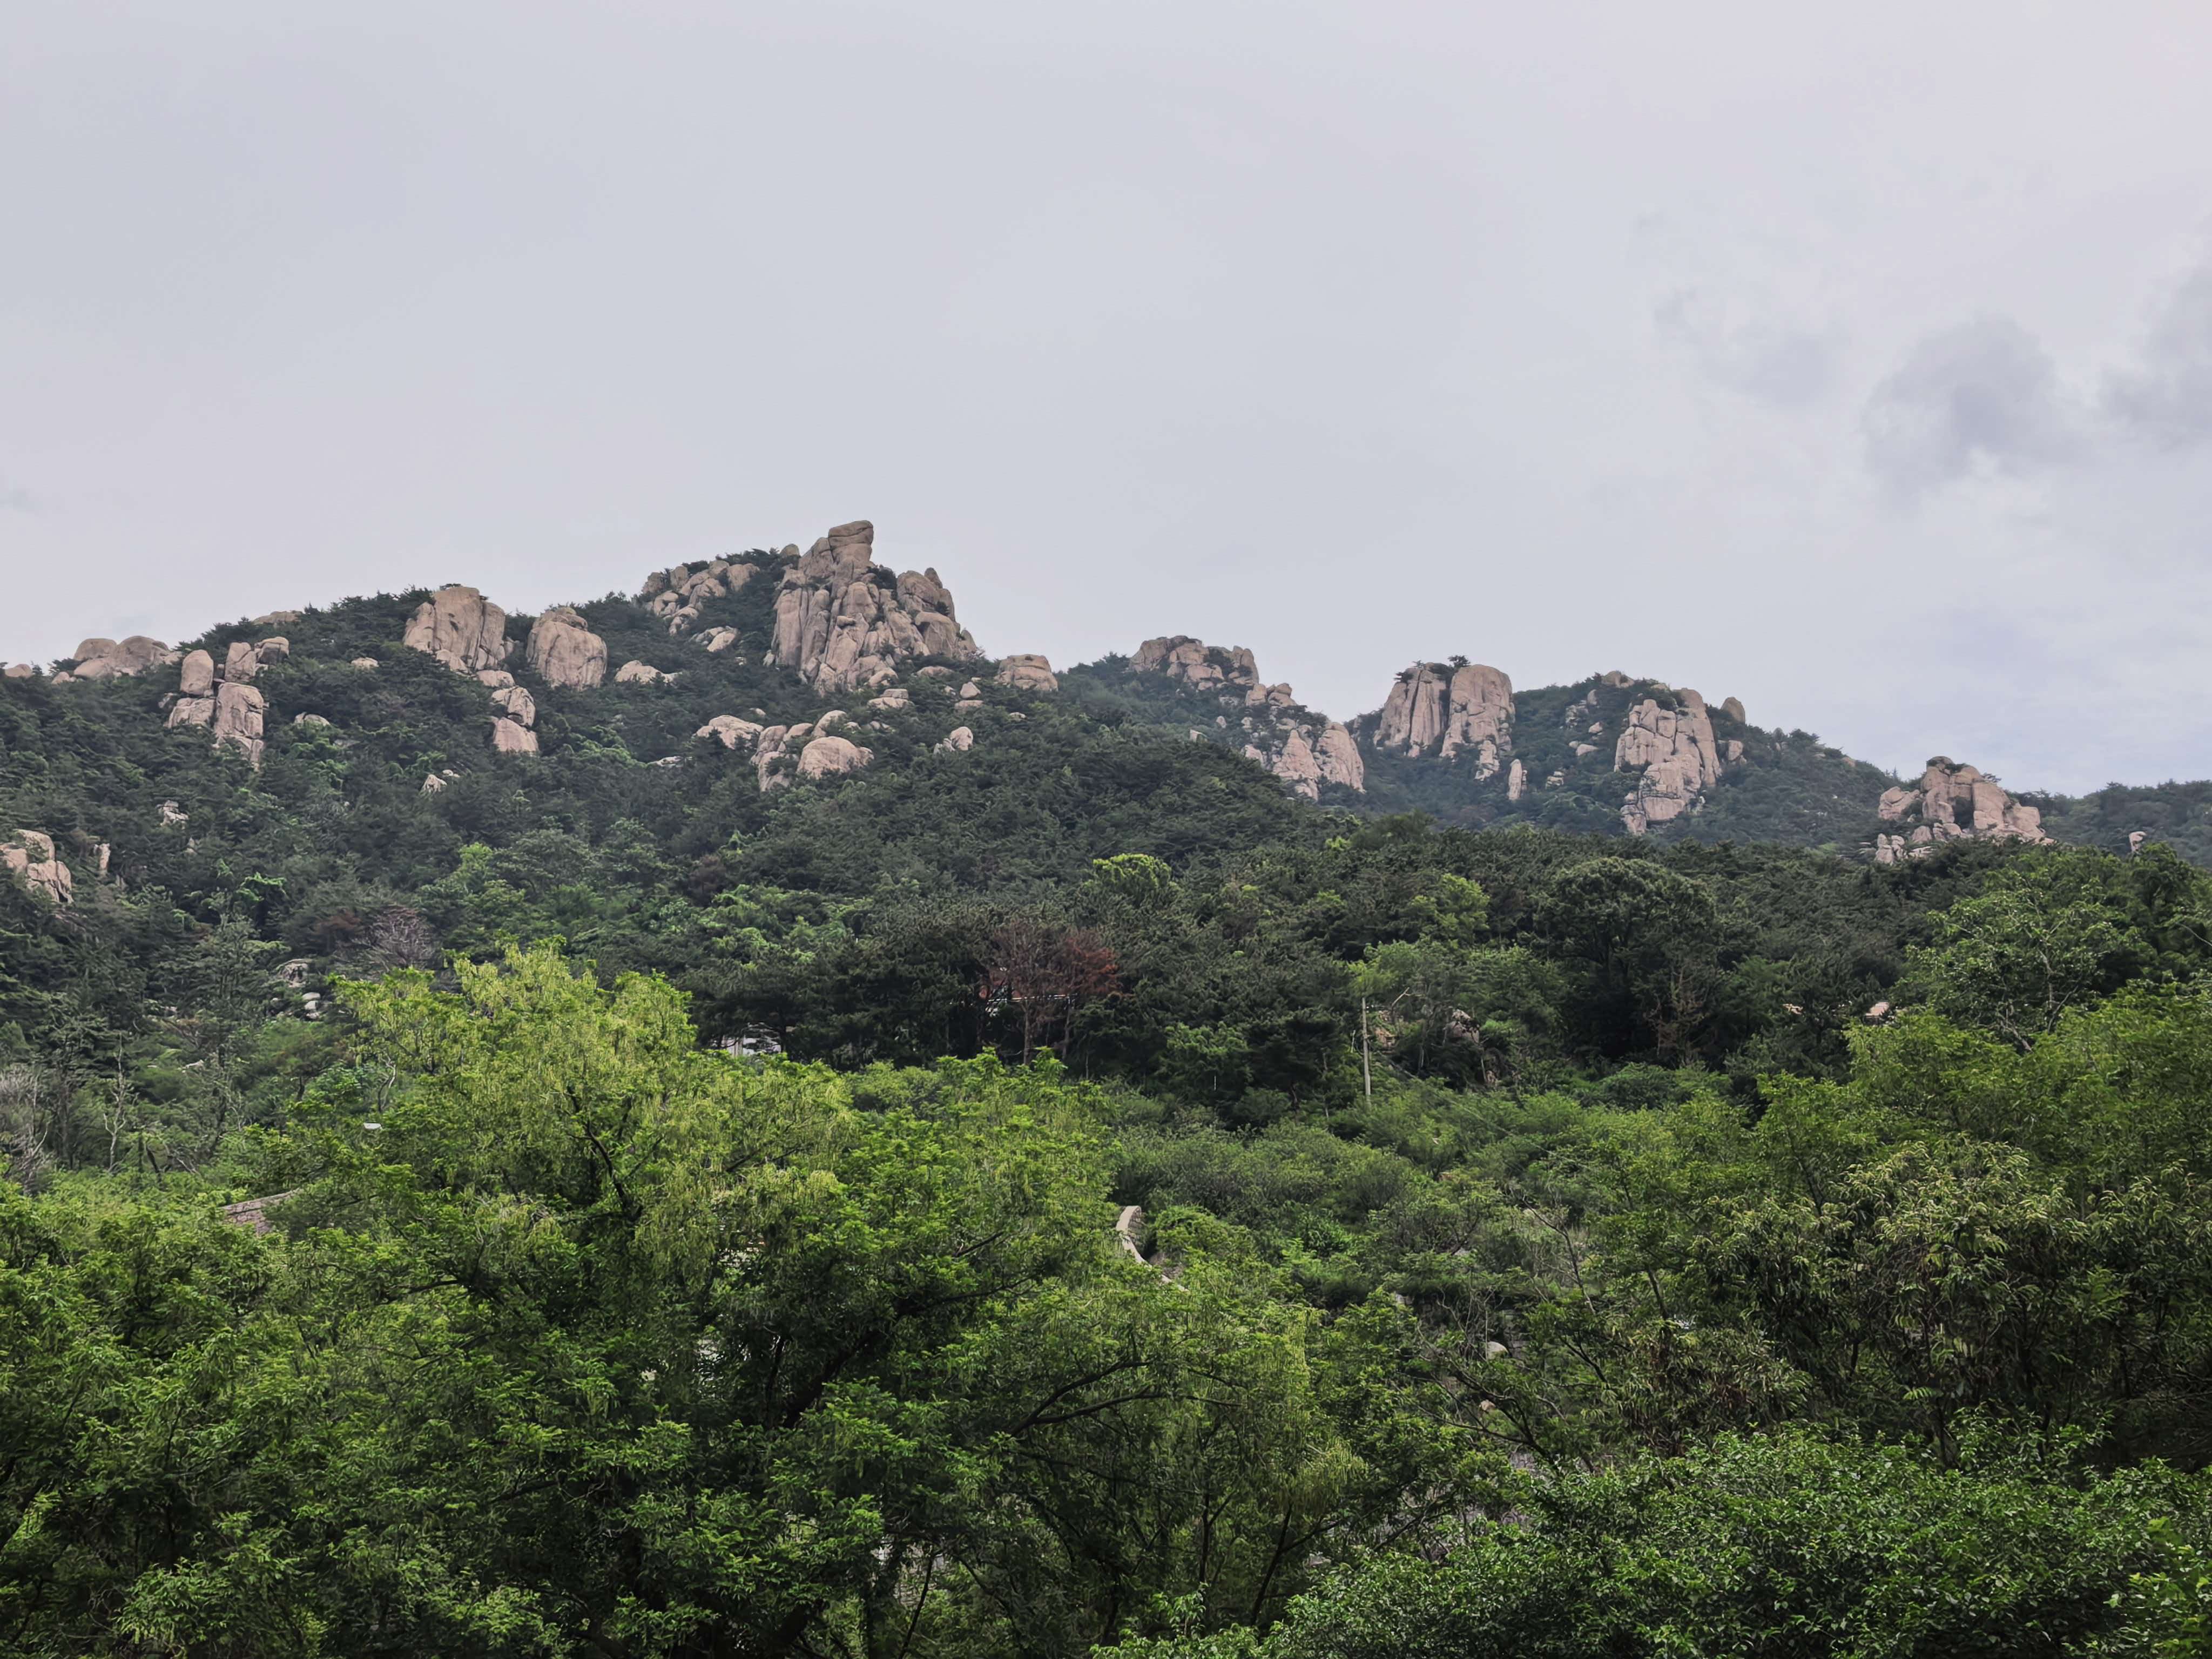
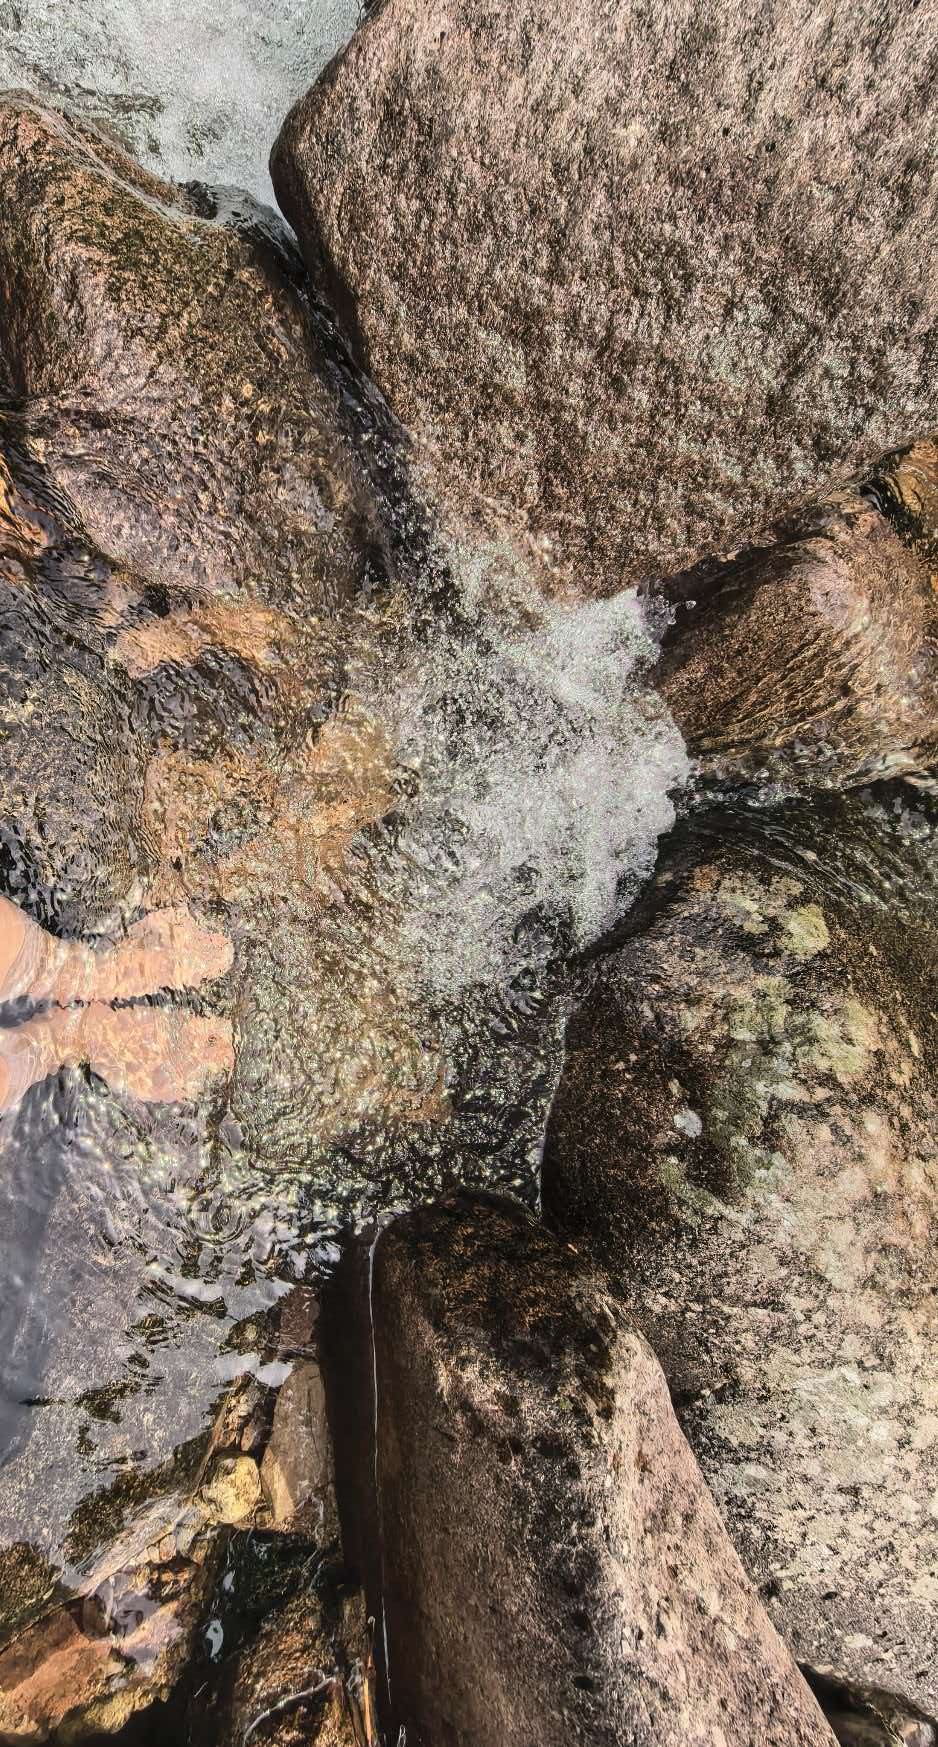
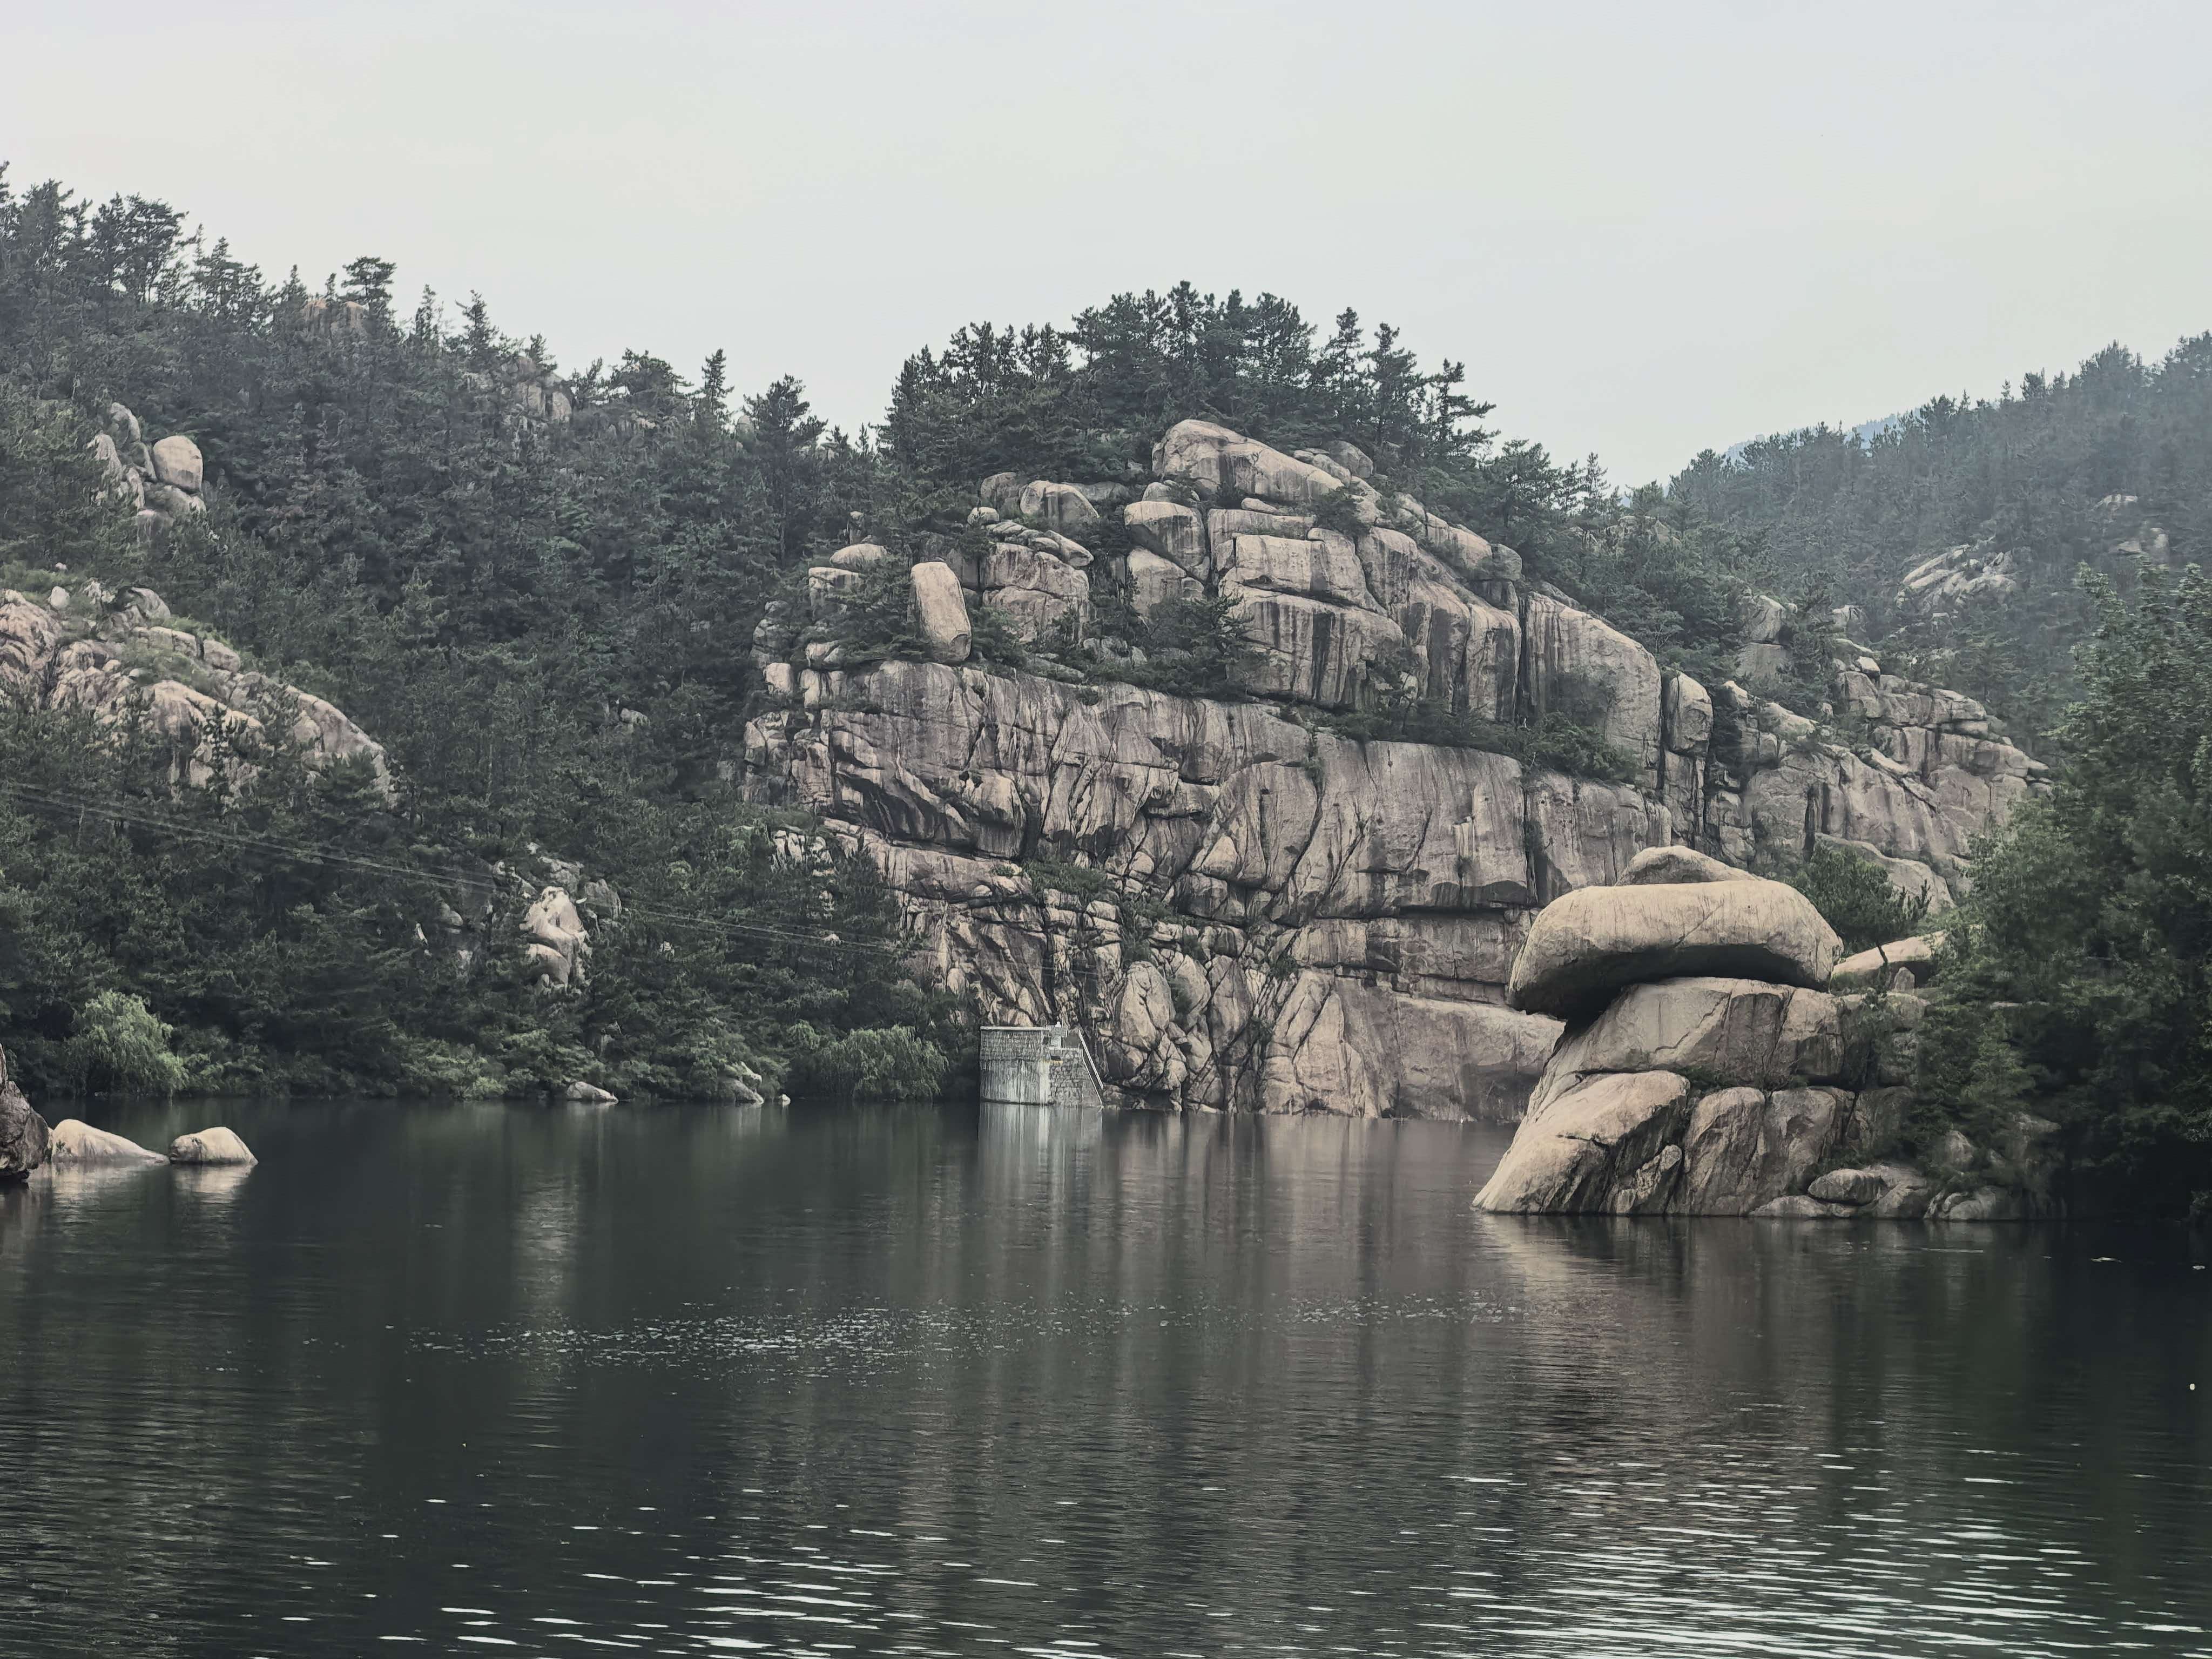
连续的雨天,让崂山景区的游客也多了起来。上次去北九水,还是宝子很小的时候,距今已经几年的光景。
连绵阴雨,自然也让崂山的瀑布景色变得更加的秀美,这次形成目标也自然是为了看雨后的瀑布。
早上八点多吃过早饭,驱车前往,路上虽然车不少的,但是进景区的只有零星几辆,前面有辆车,进山之后,后视镜里竟再无车辆出现。想来,现在时间尚早,游客应该不至于太多。
不过,这一切都是幻想,近了游客中心的停车场,路面车位已经全部停满,只好转了一圈去地下,地下停车场也已然剩余不多,虽然入口的指示牌上显示剩余458,想找到这458却并不容易。
兜兜转转,总算是找到一个停车位停好车。检票入园,做大巴前往景区。大巴等候点,对于粗粗短短,人群就那么挤在那里,也没有人维护秩序,这让人有些觉得不可思议。只能拉着宝子尽量不要让其他人给冲散了,毕竟,这个队伍的状态多少是有些异常的。
大巴车坐满也就出发了,本以为冷清的街道,竟然堵车了。花费了将近一个小时才到达景区,进山的小路上,慢慢的游客,孩子们都带着水枪,自然,对于他们来说,玩水才是正事。
跟随人流,亦或者说是半裹挟的状态,在小路上前行,少走不远,又能下水的地方,依然有的孩子迫不及待就冲了下去,开始尽情戏水。
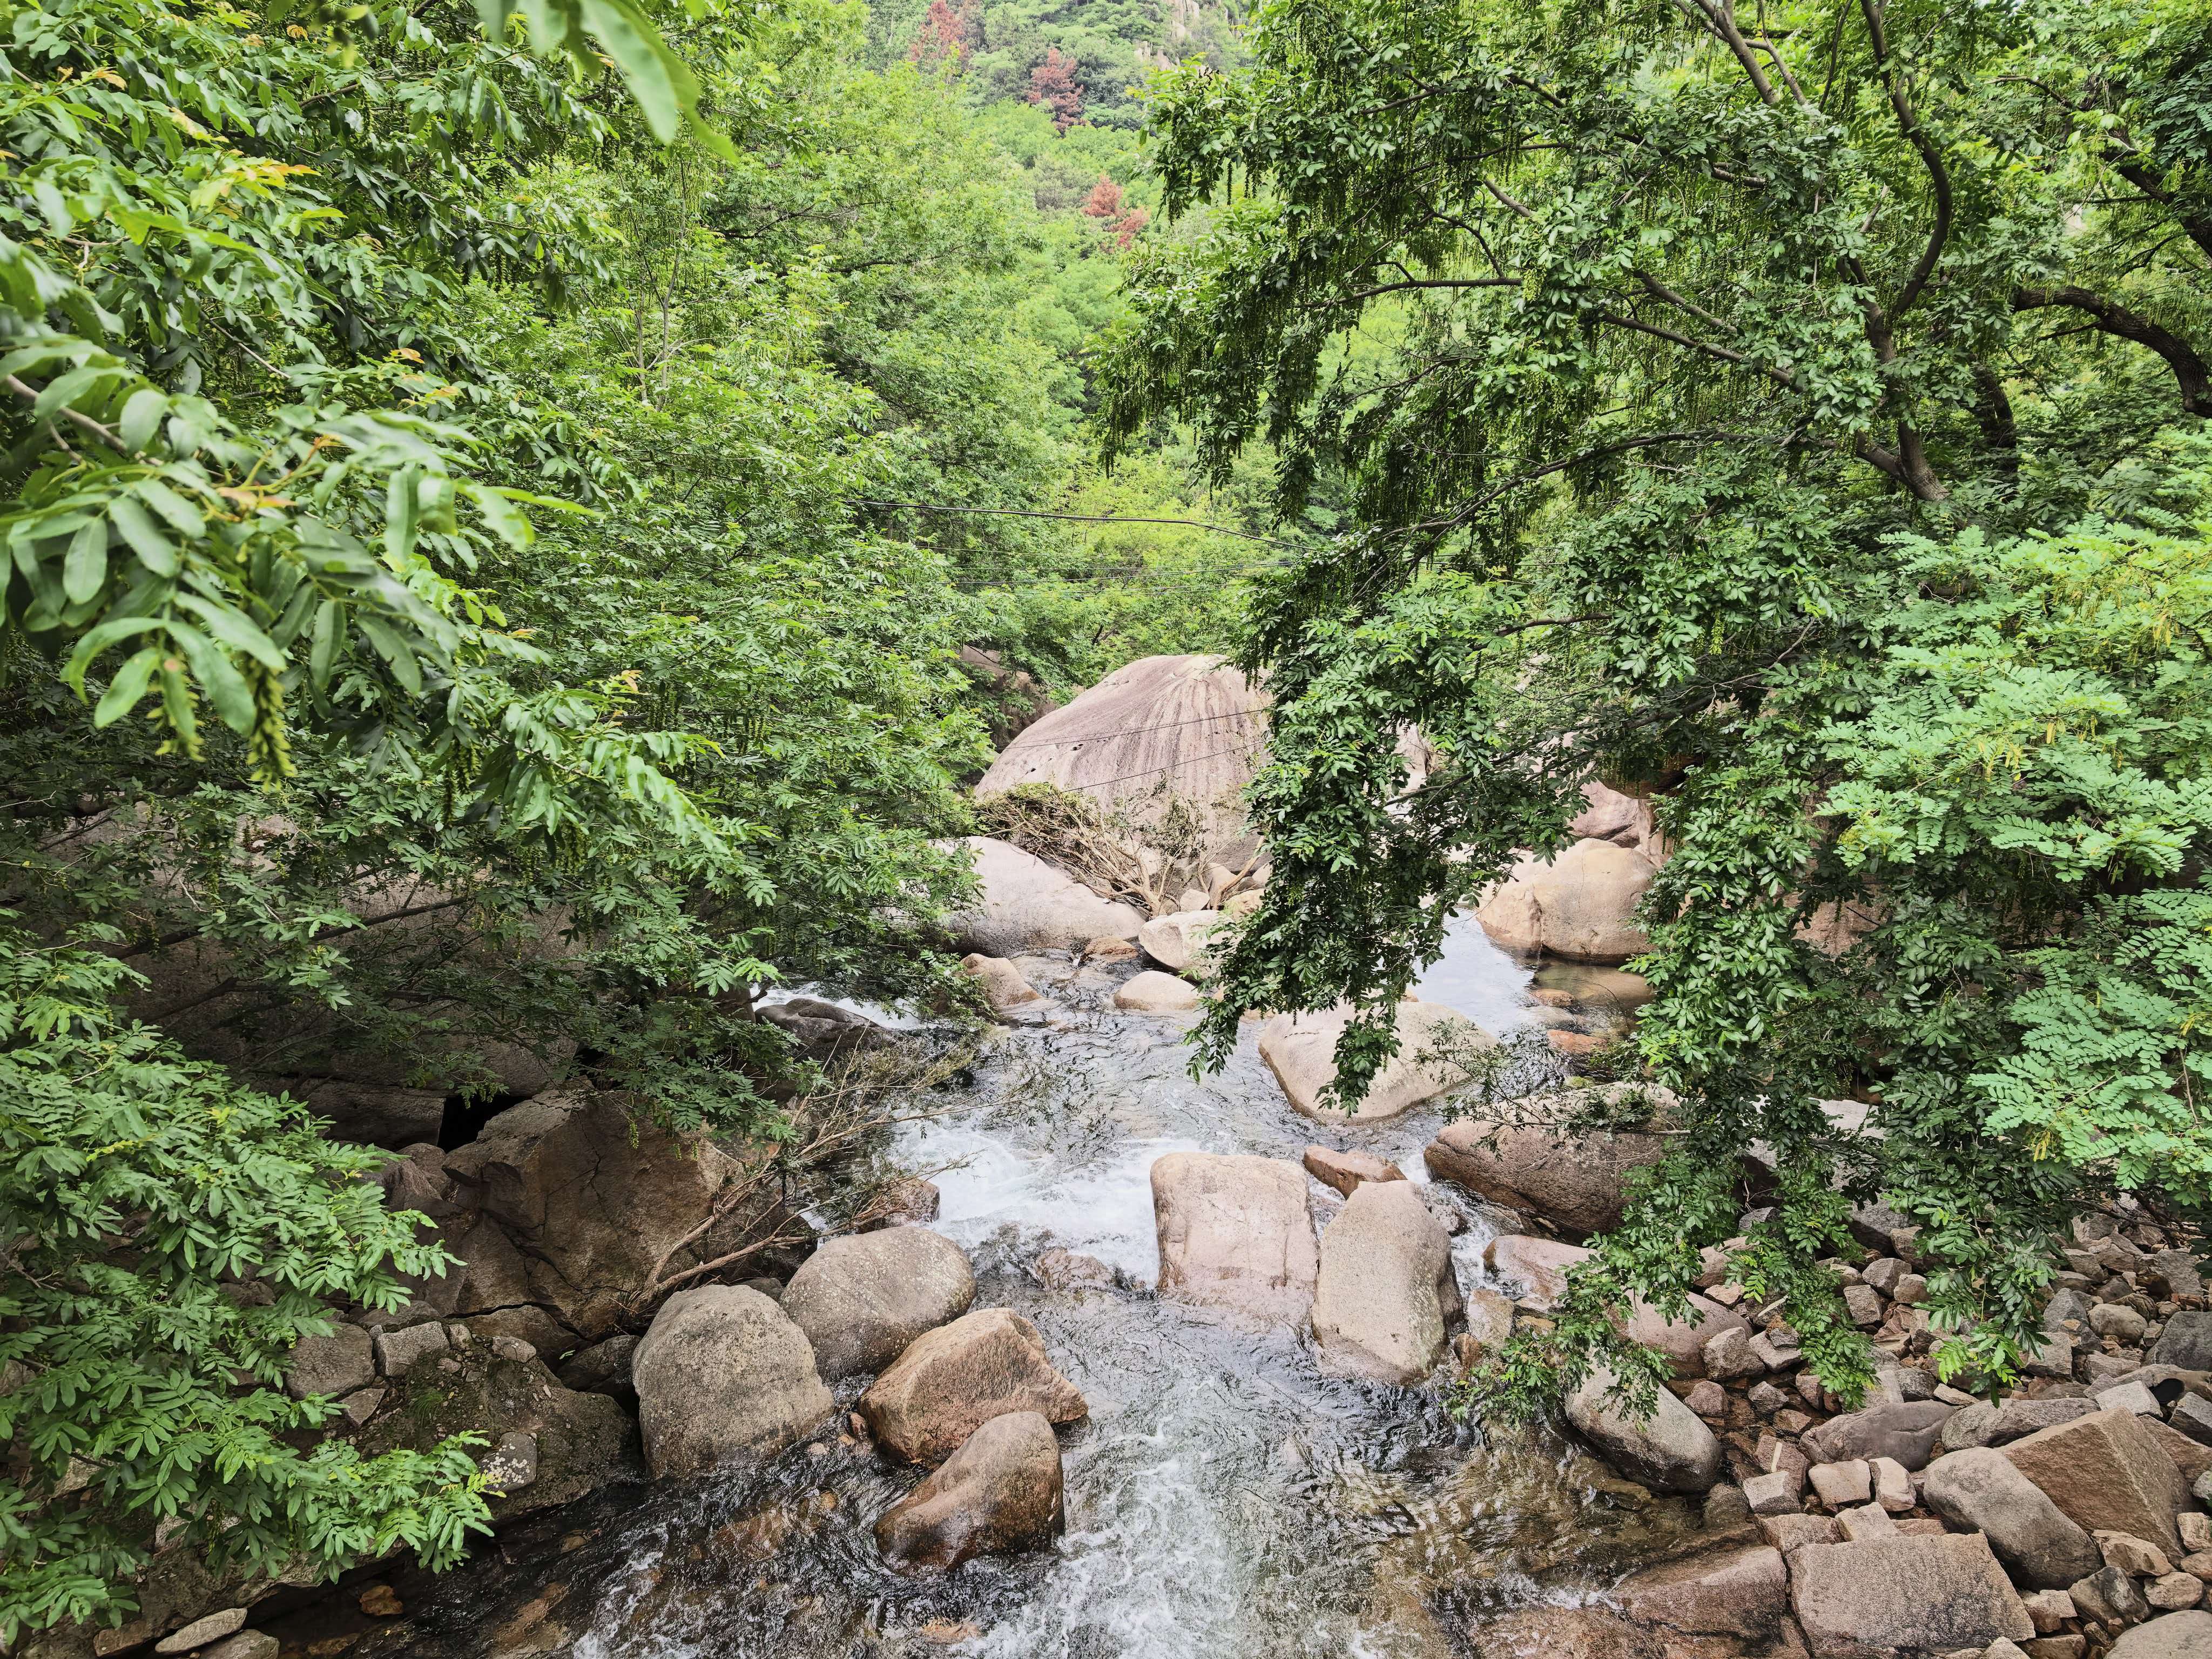
为了能够找个人稍微少点的地方,只得继续前行。20多分钟就到了接近三水另外一个检票口,这个地方河道里满是巨石,人也不是很多,刚好是个戏水的好地方。
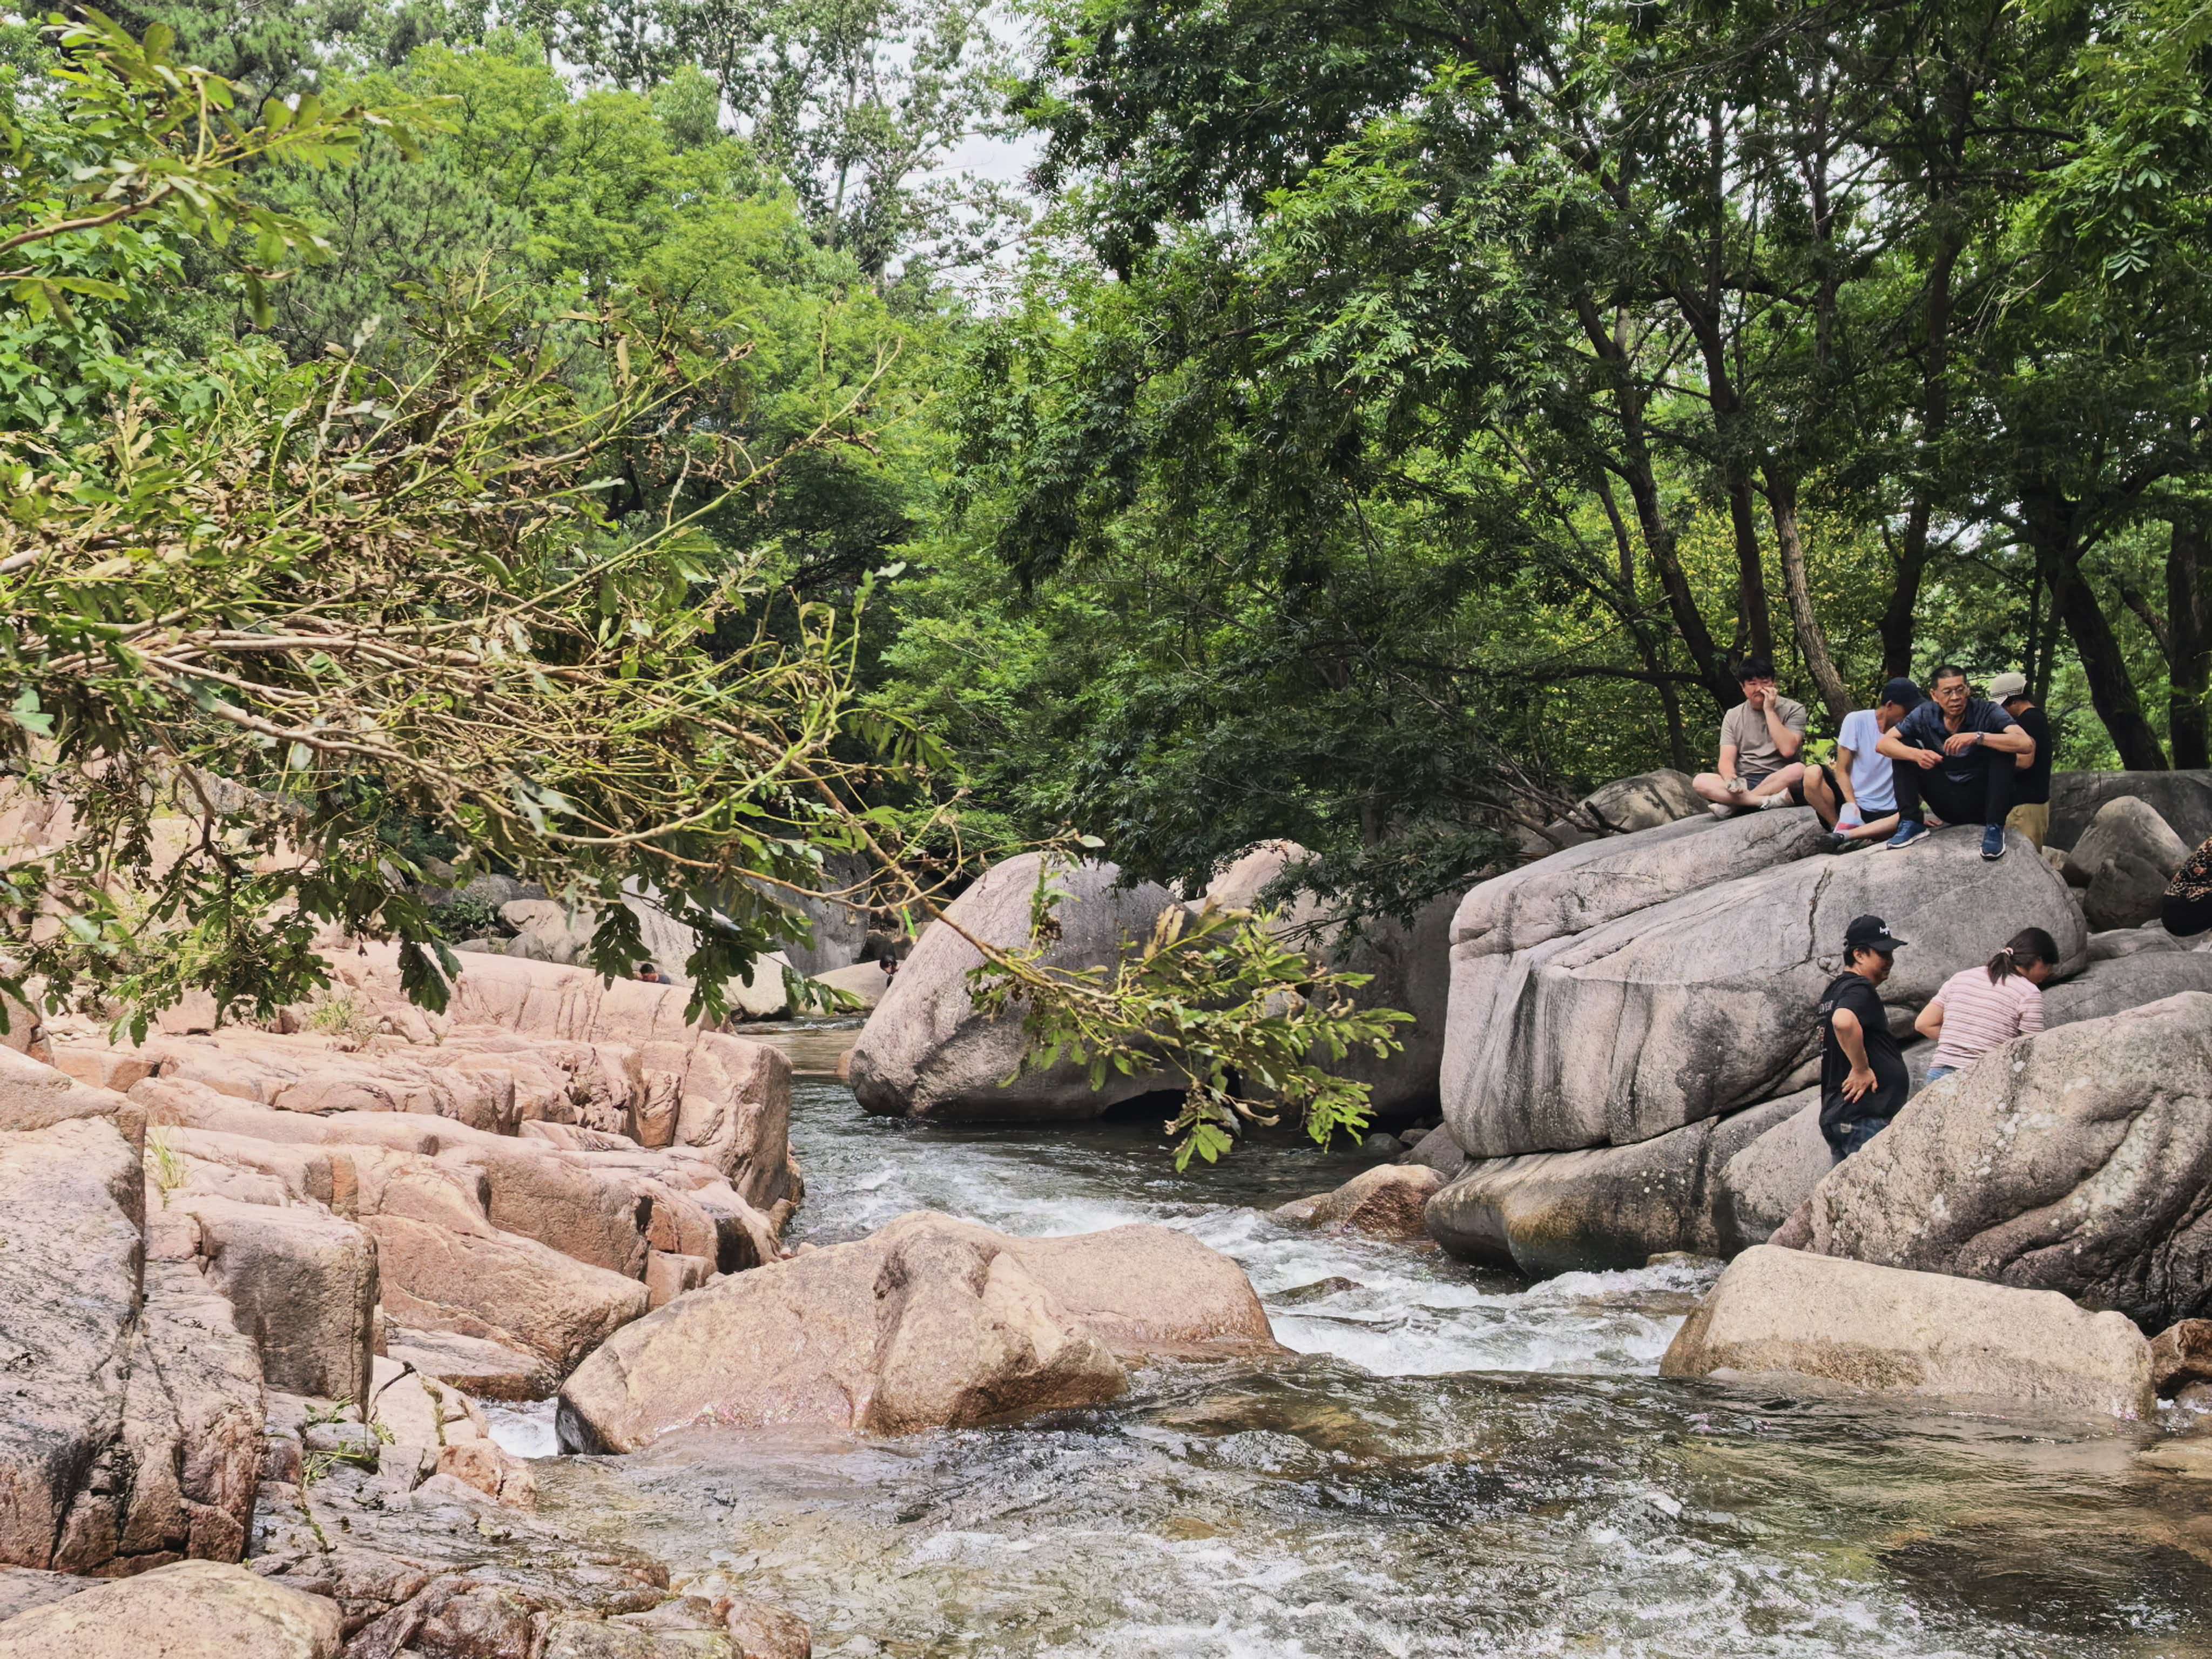

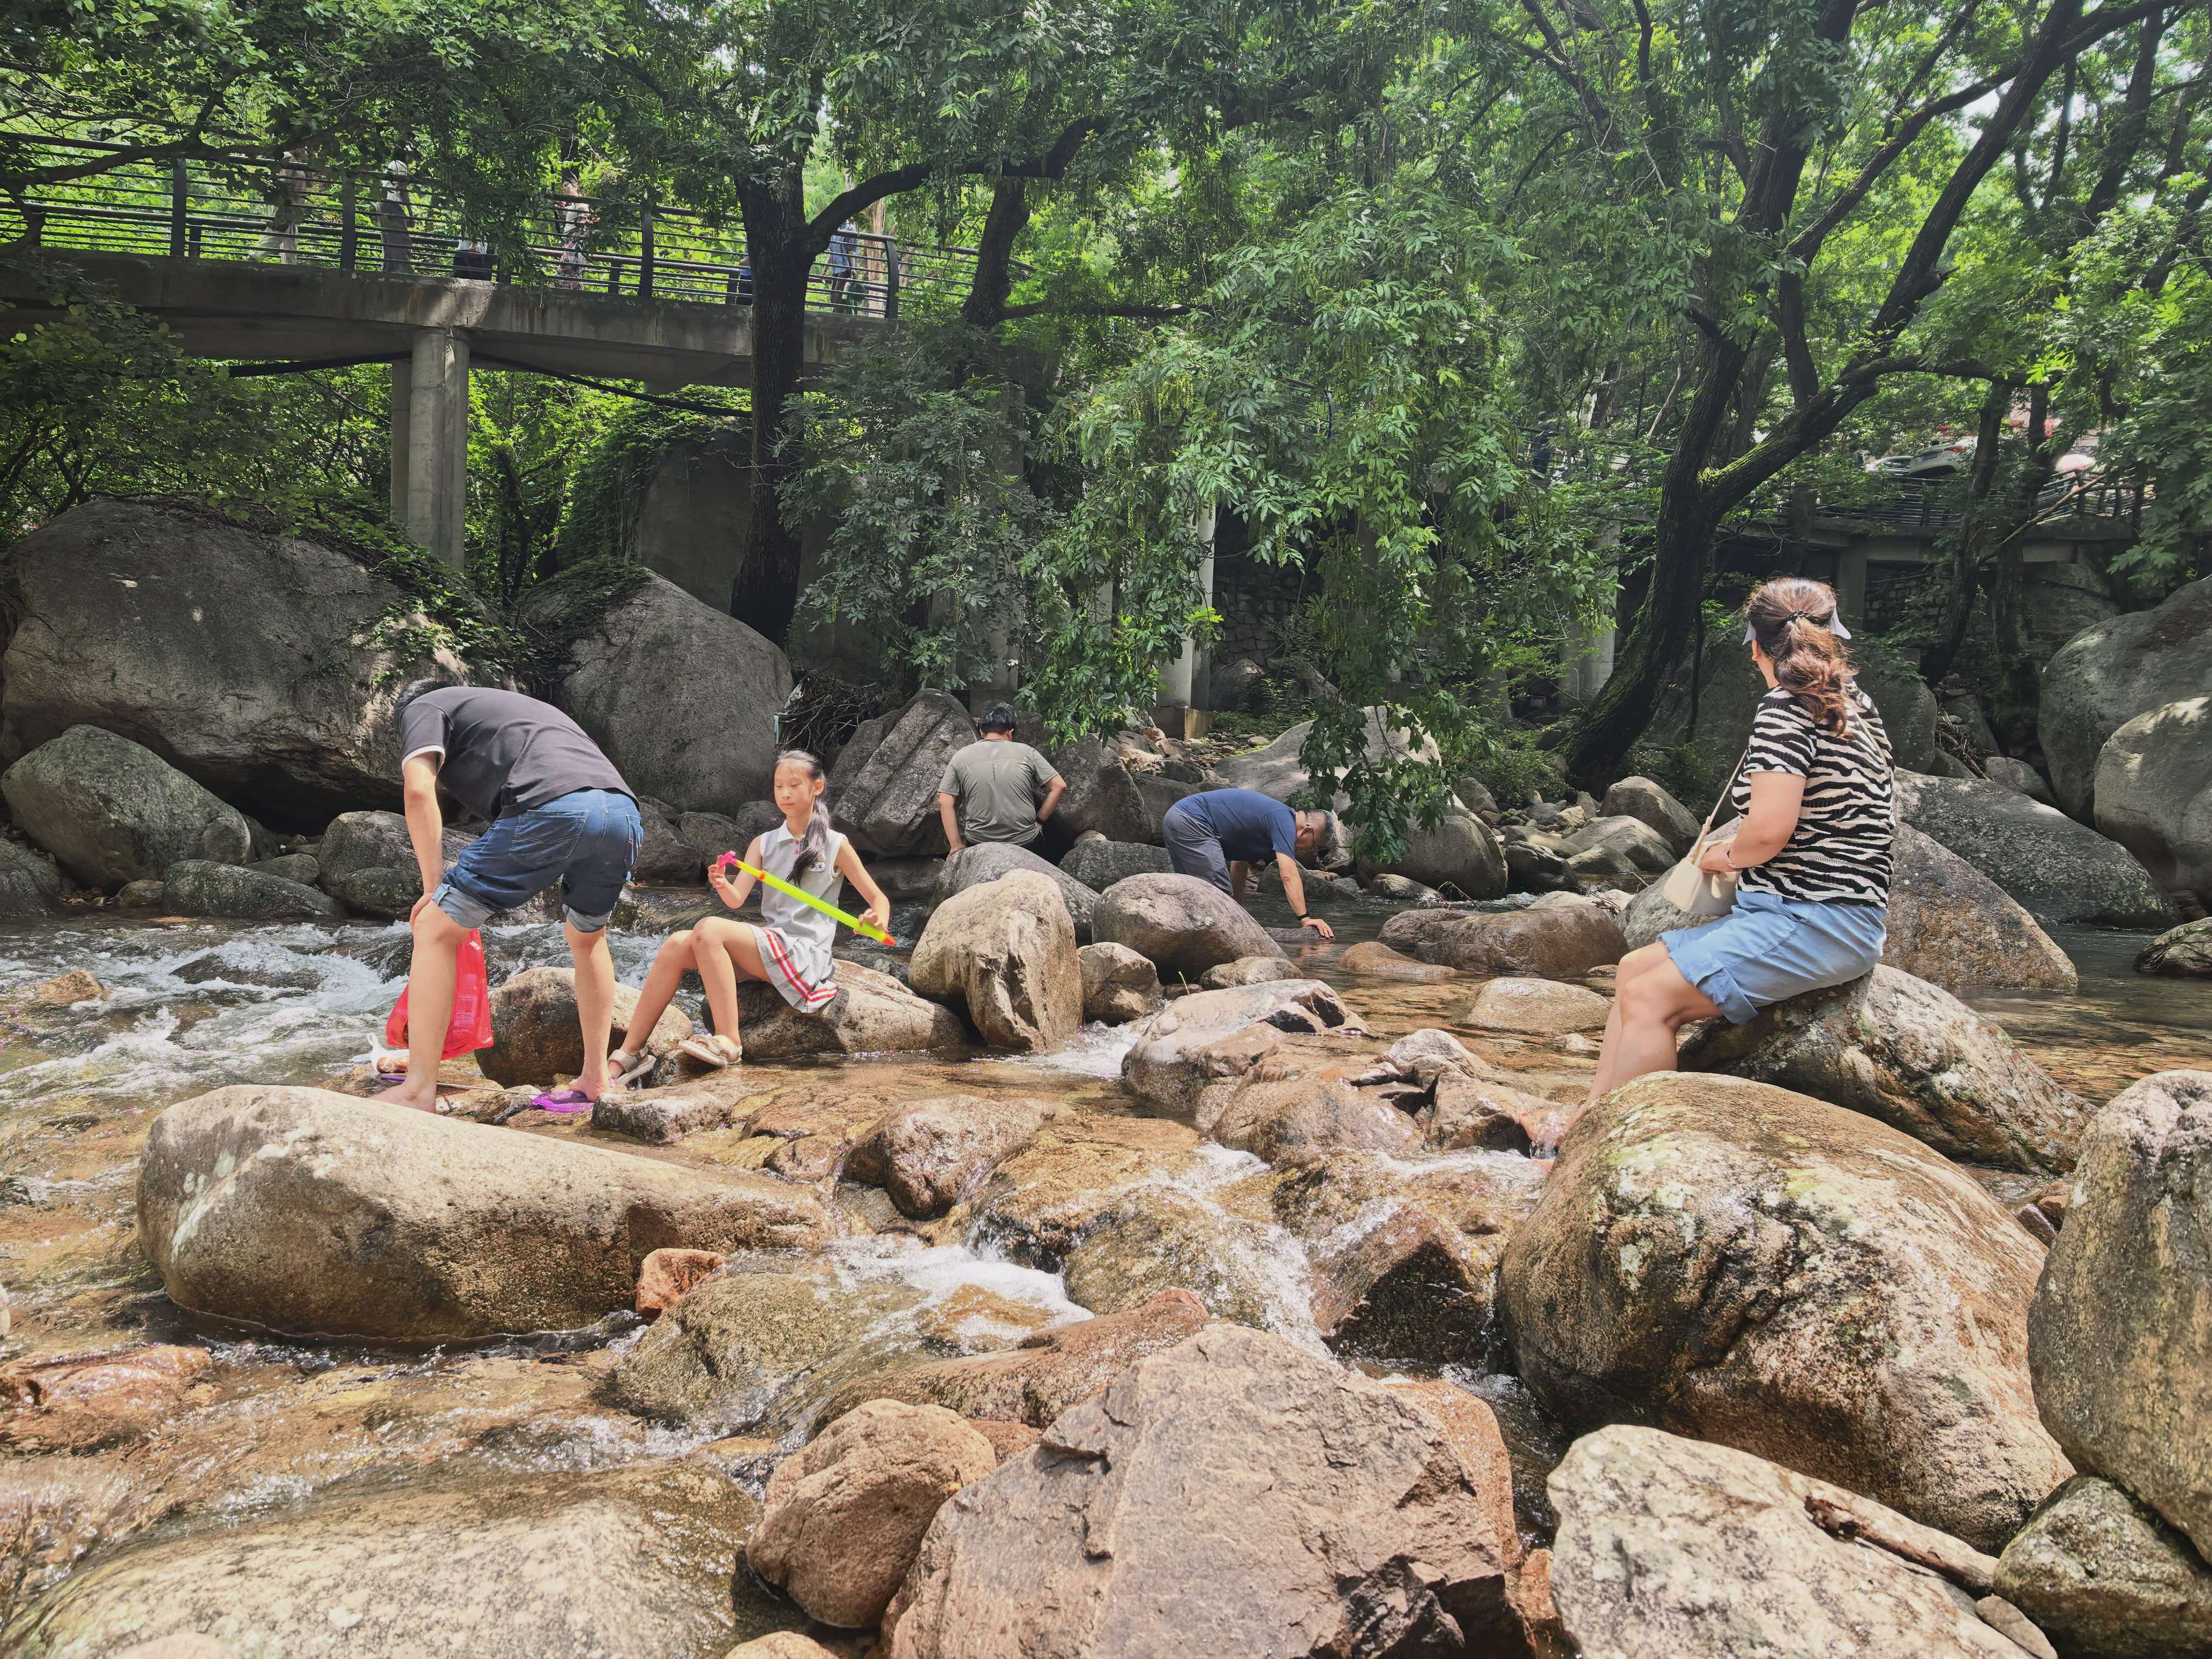
石头上长满了人,下到水里发现水还是稍微有些凉的。
等宝子玩够了,继续往内九水进发。步行几百米就到了检票口,此时宝子却再也不想走了。既然如此,也就不再往里走了。既然如此,那就不如打道回府吧。
回城顺利多了不到半小时就到了服务中心,此时地面已经乱成了一锅粥,各种车辆在地上堵着。从停车场往外出。一共三个出口,选了个离停车场入口近的出口钻了出来。此时才发现,虽然位置猜对了,但是出口方向已经被彻底堵死,只剩下一个单向的车道,无法左转,只能跟着车流右转,进入停车场再右转。重新转回出口,前面的宝马mini copper,虽然已经没车了,但是在哪里一动不动,迫不得已,只能按喇叭催了一下。对象说,技术不行就不要来这种地方了。
『就是,就是,坑爹玩意儿』我附和道。
路上宝子接到姥姥的电话,问是否已经开始往回走了。到家之后,从锅里端出热腾腾的包子,荠菜肉的,咬一口下去,沁人心脾。
『我把你那一碗肉都给你剁进去了,好多肥肉,我是坚决不吃。』宝子姥姥说。
但是,荠菜如果没有肥肉真的不香啊。
九水风景区的诸名胜中,当推内九水最佳。
在崂山白沙河上游,白沙河源出山顶北麓,河水经山脚而折流,有九折;人行河畔小路,转折处须涉水而过,亦九涉;每涉一次为一水,故称九水。九水又分内九水、外九水(即北九水)和南九水三路,其中以北九水的景观最为著名。
一水至九水是从水的下游上数的。白沙河的上游为北九水,北九水又有内外之分,自大崂至太和观(即北九水村)为外九水,自太和观至靛缸湾(鱼鳞口、潮音瀑)为内九水。北九水是内外九水的分点,也是一个极为清幽的风景点。
太和观已经重新修建。由此逆流至内九水的终点-靛缸湾瀑布,为清一色的花岗石石板路,大约3公里。
北九水村滚水桥左侧的大水潭为内九水的一水沿流而上至双石屋村,村中房屋全是石砌,村外有一深潭,这里就是二水。
再往前行就到了三水,这俗称“鹰窝河”。 越过四水,就到了著名的“飞凤崖”,即五水。再行不远,是一片赫黄色的摩天巨崖。
巨崖的石纹一律横向,这就是六水有名的“锦帆屏”也叫做“锦帆嶂”。和锦帆屏相连的还有高耸入云的“连云崖”,这里就是七水。再往前就是八水的“牙门”,由此向上攀登,就到了九水的“金华谷”。峰回路转,即听到瀑布的如雷巨声。
内九水的尽点靛缸湾亦称“潮音瀑”泉水随山势三折而落,最后倾入靛缸湾。
湾对面石壁上,刻有叶公绰写的“潮音瀑”三个大字。湾内水深石碧,呈靛兰色,水味甘冽。在夏秋之交雨水充足时,瀑布宽数米,以排山倒海之势倾入湾中,水沫飞溅,有如细雨,蔚为奇观。 [1]
循环线
溪回谷转疑无路,忽闻仙乐一声声。
沿内九水河谷可从两条线路游览蔚竹庵:一条是从内四水向上不远处,溯东北方,走过悬索桥,沿山谷上行,就进入了一个翠竹葱郁、古树参天的清静世界。蔚竹庵就在这里。游完蔚竹庵,沿山路向上绕行,又可到达观景台。后向下绕行,便进入"北九水画廊"的尽头--潮音瀑。
蔚竹庵
蔚竹庵建于明万历十七年(1589)。当时全真华山派道士宋冲儒来到这里,见山峦迭翠,涧水鸣琴,清静幽雅,实为道家清修之胜境,便不畏艰辛,建道庵于此。整个道庵占地2.6亩, 建筑面积为150余平方米,分前后两进殿院,有正殿3间、道舍10余间。位于庵东侧的古银杏树,树高25.6米,胸径1.1米,树龄有800余年。蔚竹庵西南方那株银杏树,树龄有400余年
蔚竹庵是"崂山著名十二景"之一-"蔚竹鸣泉"。
潮音瀑
分明溪谷水溶溶,何来澎湃潮水声?  岩壁上\"潮音瀑\"3个字是叶恭绰的手书。叶恭绰是20世纪30年代南京国民政府的水利 部长。右边石壁上"空潭泻春"4个字是邵元冲的手迹。邵元冲是国民党元老。 潮音瀑瀑水凌空而下,一波三折,瀑水飞泻的声音犹如澎湃的潮水,所以被誉为"岩瀑潮音"。  枯水季节,瀑布显得温和优美;盛水季节,它奔腾澎湃,气势豪迈,声音好象滚滚的怒潮。它的源头是崂顶--巨峰北侧的天乙泉。瀑布下面的水潭,清澈见底,碧蓝如靛,称\"靛缸湾\"。瀑布的第二折,瀑水冲进一个山洞,再翻涌出来注入靛缸湾。这个石洞到 底有多深?传说没有底儿。据说从前有一位看护山林的老人,一直想探探石洞的深度,便在山上用镰刀割了很多藤条,光搬就搬了3天。他把藤条一根根接起来,拴上石头投进洞里, 结果藤条全用完了也没探到底。谁知两天之后,藤条竟从十几里外的东海边露了出来。你说 它有多深?  西边石壁上刻有高凤翰的诗:"涧水从天下,奔流万派喧……\"东边石壁 上刻有黄苗子的诗:\"……三面苍崖荣碧树,千重涧水汇清溪……"上面是座小巧玲珑的\" 观瀑亭\"。站在那儿欣赏这幅大自然的画卷,体味着名人的诗篇,更会令您赏心悦目。
在Python中,Annotated主要指typing.Annotated,是Python 3.9引入的一个类型提示工具。它的核心作用是:给类型添加额外的元数据(metadata),而本身不改变类型的行为,类似Java 的注解。
Annotated的写法是:Annotated[类型,元数据,元数据..],其中:类型是必须遵守的
域名备案整改
这个博客域名在西部数码和阿里云两边都接入了备案,我的上一张身份证在2月份过期了,年前重新拍的,本来也没想着要处理这个备案,结果5月底和6月初,西部数码和阿里云相继给我发来备案整改的邮件。
先是西部数码,收到消息就赶紧上传资料整改,结果都2026年了,还必须要打印签字纸质承诺书,也是很郁闷,偷摸在单位打印机打印出来签字上传了,像干啥坏事似的,生怕人看见。结果这边初审通过已经提交管局审核两三天了,阿里云这边又发通知也让整改,我就犯嘀咕了,不会两边同时提交到管局,然后管局那边看见有重复的,然后给我注销备案吧。
在阿里云的反复催促下,也是胆战心惊的提交了,阿里云这边就拍照,录视频,提交完事,这点比西部数码强多了,好在最终也是有惊无险,相继在8号和15号两边提交的都给审核通过了。![]()
更换博客使用邮箱
前一段时间的某知名博客程序泄露用户邮箱的事情,在博客圈里也是闹得沸沸扬扬,虽然各博主的邮箱已经是公开的秘密了,要想获取到,有很多种方式,有些都直接写在个人介绍页里,但是主动介绍和被动泄露是两个概念吧。
为了自己正儿八经用的邮箱不被垃圾人和垃圾信打扰,我还是默默的把出去串门和其他一些博友圈改成了一个专门用的阿里云邮箱,也就是我的博客通知发信邮箱,毕竟可以无痛更换。![]()
宿舍没了WiFi
五月底的时候我之前被裁的那个室友也才正式搬走,去了杭州那边,之前我们宿舍的WiFi是他的手机套餐办理的,这他撤了也就把宽带拆了,随后宿舍就剩我自己一个人了,本来想着我自己办理一个,结果月初公司开会,说七月份又要切标了,我们所在的区域公司没有中标,也就是说我们时隔两年又要换公司了,人、薪资、工作内容一切照旧,只不过是和另外一家新中标的公司签合同了。
那这样的话,后面我所在的这个宿舍就剩我一个人,后面房租9月份到期,那基本上是不会续租了,剩下这几个月,也不值当单独拉一条宽带了,到时候用三四个月拆机又是麻烦事。
然后这个月又有我媳妇过来,正好手里有一张大流量卡,干脆直接全部连这个热点用,加上我媳妇最近不能出门,整天在屋里刷视频,我这张卡也是物尽其用了,用了500多个G,剩下三天剩下60多G可能还不够用,还有另外一个联通卡一百多G,也算是勉强够用吧。![]()
表姐结婚
昨天,也就是6月26号,我姑姑家的二女儿,也就是我的二表姐结婚了,由于是工作日,而且又嫁到外地市去了,还要提前去男方那边,就没办法去现场亲眼见证了,只好前几天在微信上送上祝福+礼金了。
我姑姑家有三个女儿一个儿子,当时我结婚的时候,我这三个表姐都还没有结婚,正常没结婚是可以不随礼的,但是当时一人五百也都给我随礼了,礼金簿上显得好看嘛,随后两三年,她们三个也都相继结婚,我就得原样还账回去,礼金簿就妥妥的一个借钱账本啊,后面挨个都得一样一样还回去。
说起来我姑姑家我的三个表姐,按说我姑姑本来到了享福的时候,三个闺女都出嫁了,都常回家看看也就可以了,我们是在县城北边的一个小乡镇的,结果先是三表姐嫁到了县南的镇,然后是大表姐嫁到了我们那市里,再就是昨天结婚的二表姐嫁到了我们隔壁市。
但是我们的家庭关系包括我姑姑一家,我们一家,我叔一家,一大家都挺和睦的,为啥这三个表姐一个比一个嫁的远,具体原因就不得而知了,也许是碰见属于自己的幸福了吧。![]()
一个月没静下心来记录了,这一个月实在是不知道该说些什么,5月中旬给我媳妇打电话,开玩笑的跟我讲“马上520了,给我买什么了呀,不知道你有没有给我买礼物,我反正是有个礼物送给你”我当时确实也不知道是什么,还期待了几天的快递。
结果到了520当天,正上着班呢,给我发来个消息,打开手机一看,好家伙,给我甩了个两道杠的图片,一时心里不知道是激动还是什么,可能还没准备好迎接二宝的忐忑心情吧,然后我媳妇在老家县城里面的医院做了检查,各种指标也挺正常,然后隔了一周,又去做彩超和其他一些检查,结果抽血查的有一项HCG偏低,然后开了药,连续打三天针,吃了药,又去检查,HCG的值没有翻倍,当即县医院就不收了,就让去上级医院去保胎,应该是6.1号吧,上午检查出来这样的结果之后,我直接跟家里人讲,让直接来合肥这边吧,正好现在我们宿舍没其他人,暂时只有我自己。
中午我就赶紧买票约顺风车,直接去老家门口去接,媳妇从医院回去之后,检查收拾几件衣服就过来了,也是折腾了四五个小时,晚上六点就到这边了。
第二天一早就去我们附近的901医院去检查,因为我家大宝当时就在这生的,我媳妇还是比较相信的,也是做了抽血和彩超检查,一样的结果,HCG值偏低,开了一堆药,保胎的,补孕酮的等等,医生说的倒也是那么回事,说这个是动态的,让吃一周药,静卧一周,再来复查看看,反正当时也是和那医生聊了好一会,我是感觉得到话外之意有点不容乐观,但是我媳妇是非常想保住的。
一周过去了,到了6.10号,之前检查的那位主任上午有班,就又起大早去检查,看看啥情况,果不其然,抽血化验,HCG的值没有翻倍,反而降了,出来这个结果,那基本上就没啥希望了,优胜劣汰,医生说这都是有一个自然淘汰的过程,我可能上次听医生讲的有一点点心理准备吧,我就讲要是保不住就不要了,当然医生是不会说这个话的,我媳妇是哭的一把鼻涕一把泪,搁谁心里都难受。
然后又做了几项术前检查吧,让回去再再考虑考虑,然后预约了第二天的手术,晚上回来跟家里人商量了一下,没办法,都已经讲这么明白了,硬要保,万一后面有什么缺陷,更麻烦,第二天一早也是过去准备手术了,前面有几位,差不多10点半左右才做上,小手术,倒是快,半个小时结束,然后在休息室休息半小时,等麻醉醒过来,就打车回去了。
今天已经算是第十天了吧,我媳妇是一点凉水不能碰,不然落下毛病,以后不是这疼就是那疼的,我就工作,做饭两点一线,只能好好伺候着,希望下次能够顺利一些吧,原本不想记录的,也不是什么好事,今天也是静下心来记录一下吧,也算是不一样的人生经历。
端午假期三天也是各种鸡鱼排骨的做给她吃,我跟着吃几天营养餐,我感觉我都要吃胖了。。。再修养一周,下周再去做个复查,基本上就恢复的差不多了,先养好身体再说,明年30岁,还有机会,希望下次顺利。